Quick Gelli Christmas Cards

This year I had two requirements for the Christmas cards: quick and handmade! The theme had also been selected: candles, suitable for all religions and all ages. All I had to do was to figure out how to make a lot of cards and fast. This first photo is a snapshot from my studio while I was making the cards.
Planning
Before I got my table full of cards and more under making, I had to discover the process of creating the cards. My artistic side wanted something that looked handmade but was still somewhat warm and painterly. The task was transferred to my engineering side who turned on the computer and made a sketch of a single card in Photoshop. The card would consist of two layers of paint. Needless to say, using the Gelli plate would be handy!
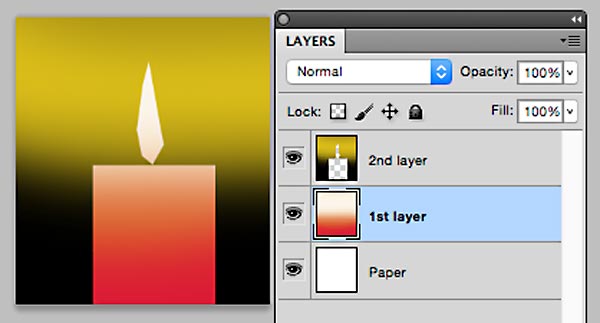
But this plan was not enough. I wanted to create not only one card, but several at the same go. While walking the dogs, I solved the problem. Here are the step-by-step instructions of how to make simple candle holliday cards. You can make them more complicated by adding doodles and such but the basic design is very simple. By following these steps, you can serially produce handmade cards!
Supplies

You will need: Paper, glue, cardboard, acrylic paint in few colors, brush, brayer, scissors, black pen and 8” x 10” size Gelli plate.
Optional: Paper trimmer for cutting the straight edges. Some kind of a stick, a pallette knife or a knitting needle for example, for drawing surface patterns.Double-sided tape if you prefer that to glue for attaching the printed image to the cardboard.
1) 1st Layer: Candles
Paint the center of the plate. The width of the painted area is 5 to 6 inches of the height of 10 inches. You can cut a paper of that width and use it as a guide by putting it beside or under the plate.
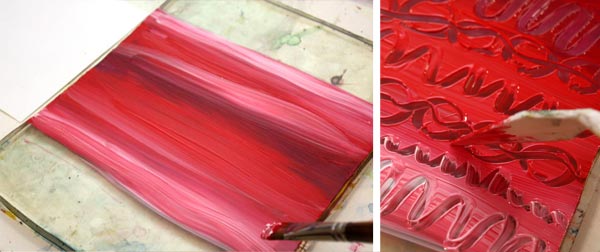
You can draw patterns with a stick if you like. I like to use more than one color to make the candles look lively. You can use brayer for the paint but I prefer to use brush and work horizontally. That way the candles will have horizontal color slides.

Cut your papers to the size of the Gelli plate before printing them. You will get 2 to 3 prints from the one layer of paint. Let dry.
2) 2nd layer: Backgrounds
While waiting the paint to dry, cut the masks for the candles. You will make four candles from the one print. For the four candles, you will need four rectangles, 2-3 inches wide and 5 to 6 inches long. Furthermore, you will need four flames. Fold a paper twice in half and cut one flame at the same go or enjoy your time with the scissors and cut the shapes individually.
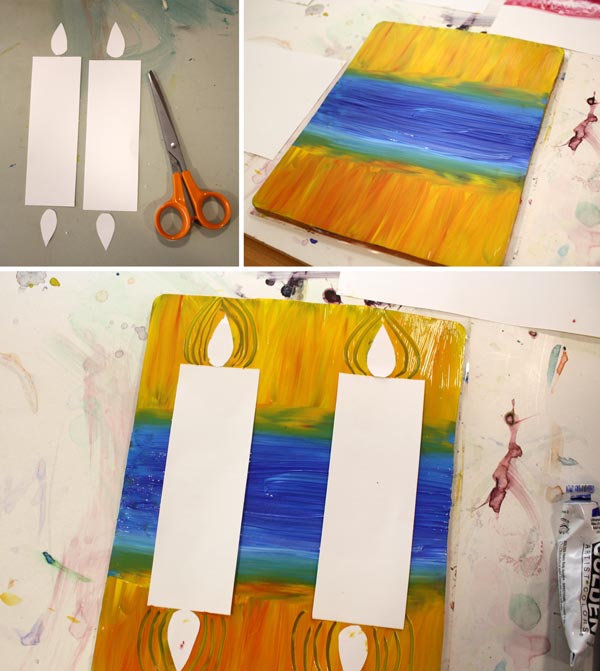
Paint the background with two colors. The center with a darker color (blue, black or green, for example) and the sides with orange yellow. I like to use color mixtures here too. Place the masks so that the distance between them is the twice longer than the distant from the edges. If you want, you can emphasize the flames by drawing lines around them. Make the prints. Let dry.
3) Cut the prints, save the flames
Save the masking papers for the flames. Cut the prints in four parts with scissors or with a paper trimmer.

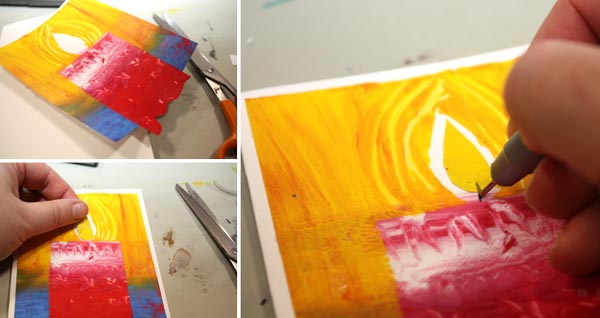
In the third photo beside the trimmer you can see one alteration of this pattern: use Gelli plate in the other way and create an image with a several candles! By cutting various sizes of masks you get variation for your candles.
4) Finishing
Cut a small part of the background away from the both sides of the print. Cut curvy lines to the bottom edge of the candle. These will make the candle look like it’s set on the snow.
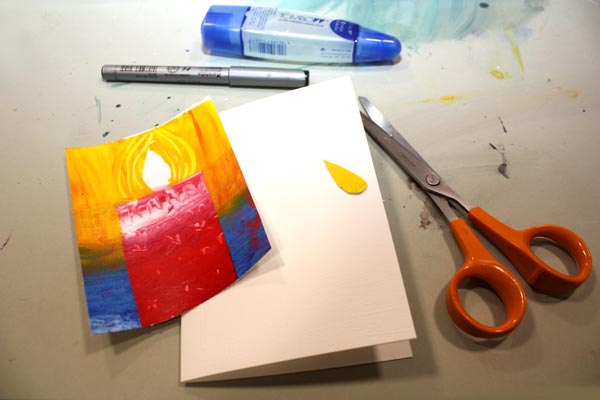
Attach the print to the cardboard. Glue the mask on place or color the center of the flame with a colored pencil or a marker. Draw a wick with a black pen.
5) Variations!
You can make all kinds of variations from the basic instructions. You can add the number of candles, cut them out and glue many candle on the same card, doodle on the candles etc.

I still have few cards to finish and one more task to do: Write “Merry Christmas” or “Hyvää joulua” (same in Finnish) on each one!
More holiday crafts from the previous years:
Wrapping Paper from Newspaper and Elegant Christmas cards
18 thoughts on “Quick Gelli Christmas Cards”
Comments are closed.
Good Morning from Alabama in USA…. I love your work as usual. I myself have temporarily put my quilts aside in order to make mosaic crosses, vases, picture frames, tables, mirrors, etc…
The work you did for the cards is very new to me. What exactly is a “gelli plate”?
I look forward to hearing from you!
Lisa
Lisa, it is a gel plate that you can use for monoprinting. Here’s one of my video blog posts that is worth watchging if you want to see monoprinting in action: http://www.peonyandparakeet.com/video-blog-apples-and-tomatoes-with-a-gelli-plate/
Gelli plates can be purchased from craft stores and from http://www.gelliarts.com
This is a really great way to make beautiful, handmade cards and I sure will have fun doing this! Thanks so much for the idea.
Thanks, Mary! Have fun!
I especially love that you decided efficiency was only a tiny bit as important as creativity. Beautiful, thoughtful result.
Thanks, Susan! Balancing between efficiency and creativity has been the theme for the whole autumn!
Love this idea. Your brain is amazing. Thank you for the idea.
Thanks, Denise!
Stunning! If I hadn’t already made my cards for this year, I would be using your idea. Maybe I’ll make them anyway and save them for next year!!
Thanks, Christie! You have been early with the cards! You can always make a few and give them for charity!
Thanks so much for sharing this wonderful idea. It is so timely for me as I am in the process of making some Christmas cards for my sister to sell at a craft fair she is attending. I have made a series using her handmade paper but she keeps asking for me to use the gelli plate prints. This is perfect! Thanks again! Happy Holidays!
Thanks, Ann! Have a great time making the cards!
I loved your approach…and the finished project is inspiring!! Wish I was on your Christmas Card List!
Thanks, Peggy!!
These are lovely and inspiring Paivi!
Thank you, Shelly!
I SO need to start doing this for Christmas cards. I normally make around 150 or so, to give and to sell in craft fairs. Having several sets of the Gelli prints will keep my costs down.. I live in a retirement area, most people here are on a pension, so no $5 cards and up.. they won’t sell.
Karen, have a great time making the cards!